A grain of sand may look like a tiny, ordinary stone. Under a microscope, it may show sharp edges, rounded surfaces, or several minerals joined together. The same instrument can reveal cells in a thin piece of onion skin, but the two samples need different lighting and preparation. Choosing the right microscope and method matters as much as making the image larger.
In the News
Scientists find 57,000 cells and 150m neural connections in tiny sample of human brain — The Guardian, 9 May 2024. Researchers photographed more than 5,000 extremely thin tissue slices with an electron microscope. They joined the images to map cells and connections in a piece of brain measuring just one cubic millimetre. Thin slices can reveal a complex three-dimensional structure when their images are studied together.
‘It’s a history lesson’: fossil fish up to 16m years old found perfectly preserved in central NSW — The Guardian, 18 March 2025. Microscopic details in the fossils included colour-producing structures and material inside the fishes’ stomachs. Those observations helped researchers investigate what the fish looked like and ate. A small feature can provide evidence, although its interpretation still needs care.
Researchers hope powerful new microscope will reveal ‘root cause’ of incurable bowel disease — The Guardian, 14 September 2026. A specialist light microscope can distinguish some cell structures roughly 20 nanometres apart, according to the researchers. They hope to examine how cells form barriers in the intestine. Better resolution may help answer the question; it has not yet established the cause of the disease.
What do you think?
1] Why might a thin piece of onion skin be easier to see through than a thick piece?
2] How could a brighter lamp sometimes make a pale object harder to see?
3] What could you learn by looking at the same sand from two beaches?
4] Why might a clear drop of pond water contain things you cannot see with your eyes?
5] If a photograph is enlarged until it becomes blurry, has it gained detail?
6] Why would you examine a whole leaf before examining one small part?
7] What might go wrong if a glass lens touches a hard grain?
8] How could a bubble of air be mistaken for part of a sample?
9] What clues might show that a grain has been worn by water?
10] Why is a labelled drawing useful when an object moves or dries?
11] What could make two observers describe the same grain differently?
12] If a tiny black ball sticks to a magnet, what other explanations should you consider besides “from space”?
13] Why might you use light from above for one sample and light from below for another?
14] How could dirt on a lens mislead an observer?
15] Why is it useful to keep a sample from each collection place separate?
16] What information would a ruler beside a tiny object add to a photograph?
17] Why could a coloured liquid make a nearly clear structure easier to notice?
18] How might cutting an object change what you can learn about it?
19] When is a careful low-power view more useful than a blurry high-power view?
20] What evidence would persuade you that an unusual grain is truly unusual?
Did You Know?
- Robert Hooke named the tiny compartments he saw in cork “cells” in 1665. He was looking at dead plant tissue.
- A prepared rock thin section is commonly ground to about 30 micrometres thick so light can pass through many of its minerals.
- A single grain of sand can carry a community of bacteria on its surface. A scanning electron microscope has been used to image one.
- An air bubble under a coverslip can look like a mysterious round specimen. Its dark rim and change in appearance as you refocus are useful clues.
Vocabulary
- grain of sand — 모래 알갱이
- sharp edge — 날카로운 모서리
- rounded surface — 둥글게 닳은 표면
- thin slice — 얇은 절편
- light source — 광원
- from above — 위에서
- from below — 아래에서
- clear drop — 투명한 물방울
- field of view — 관찰 시야
- low power — 낮은 배율
- high power — 높은 배율
- adjust the light — 빛을 조절하다
- move the slide — 표본 유리를 움직이다
- focus knob — 초점 조절 손잡이
- air bubble — 공기 방울
- dark rim — 어두운 테두리
- pale structure — 희미한 구조
- clean slide — 깨끗한 표본 유리
- excess water — 남는 물
- paper towel — 종이 수건
- onion skin — 양파의 얇은 속껍질
- cell wall — 세포벽
- pond water — 연못물
- rock thin section — 암석 박편
- crossed polarizers — 서로 직각인 편광판
- worn by water — 물에 닳은
- collection place — 채집 장소
- magnetic grain — 자석에 끌리는 알갱이
- false positive — 잘못된 양성 판정
- labelled drawing — 이름을 표시한 그림
Glossary
Microscope — An instrument for examining small objects. Different kinds form images in different ways. The best kind depends on the sample and the question. 현미경.
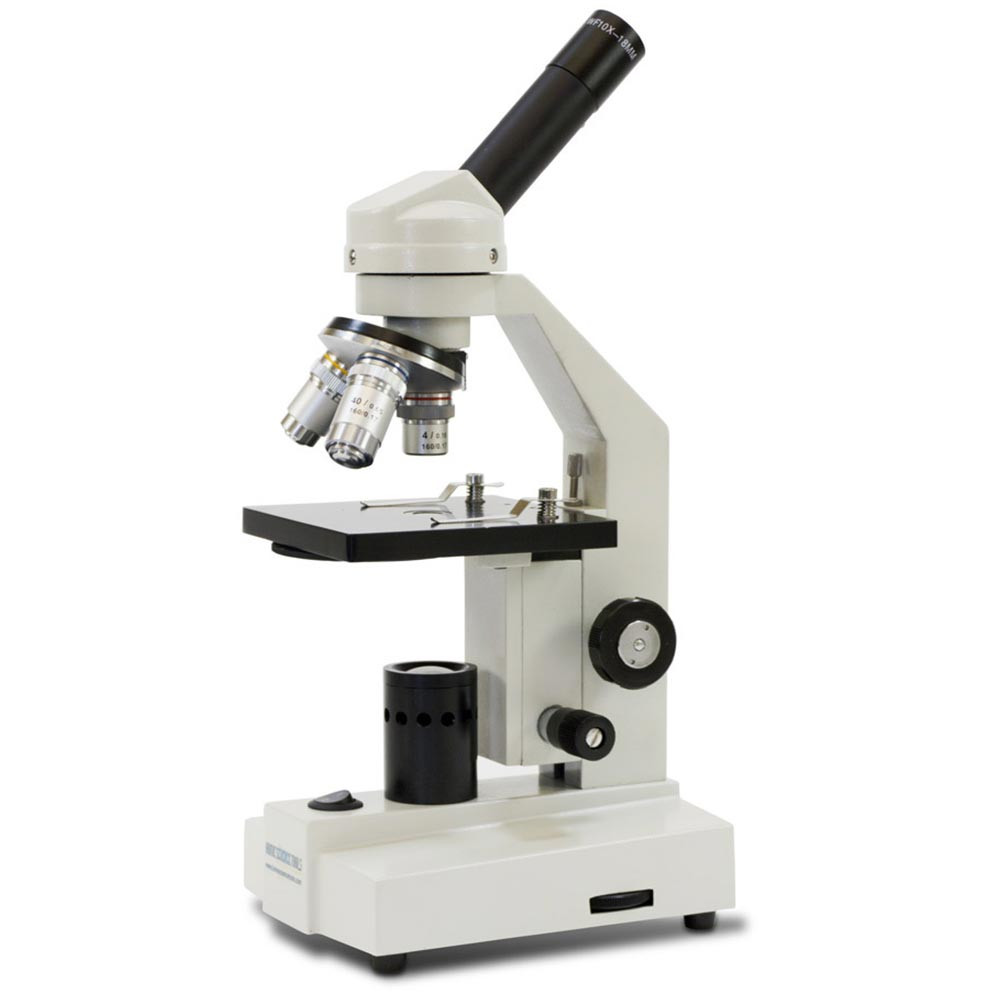
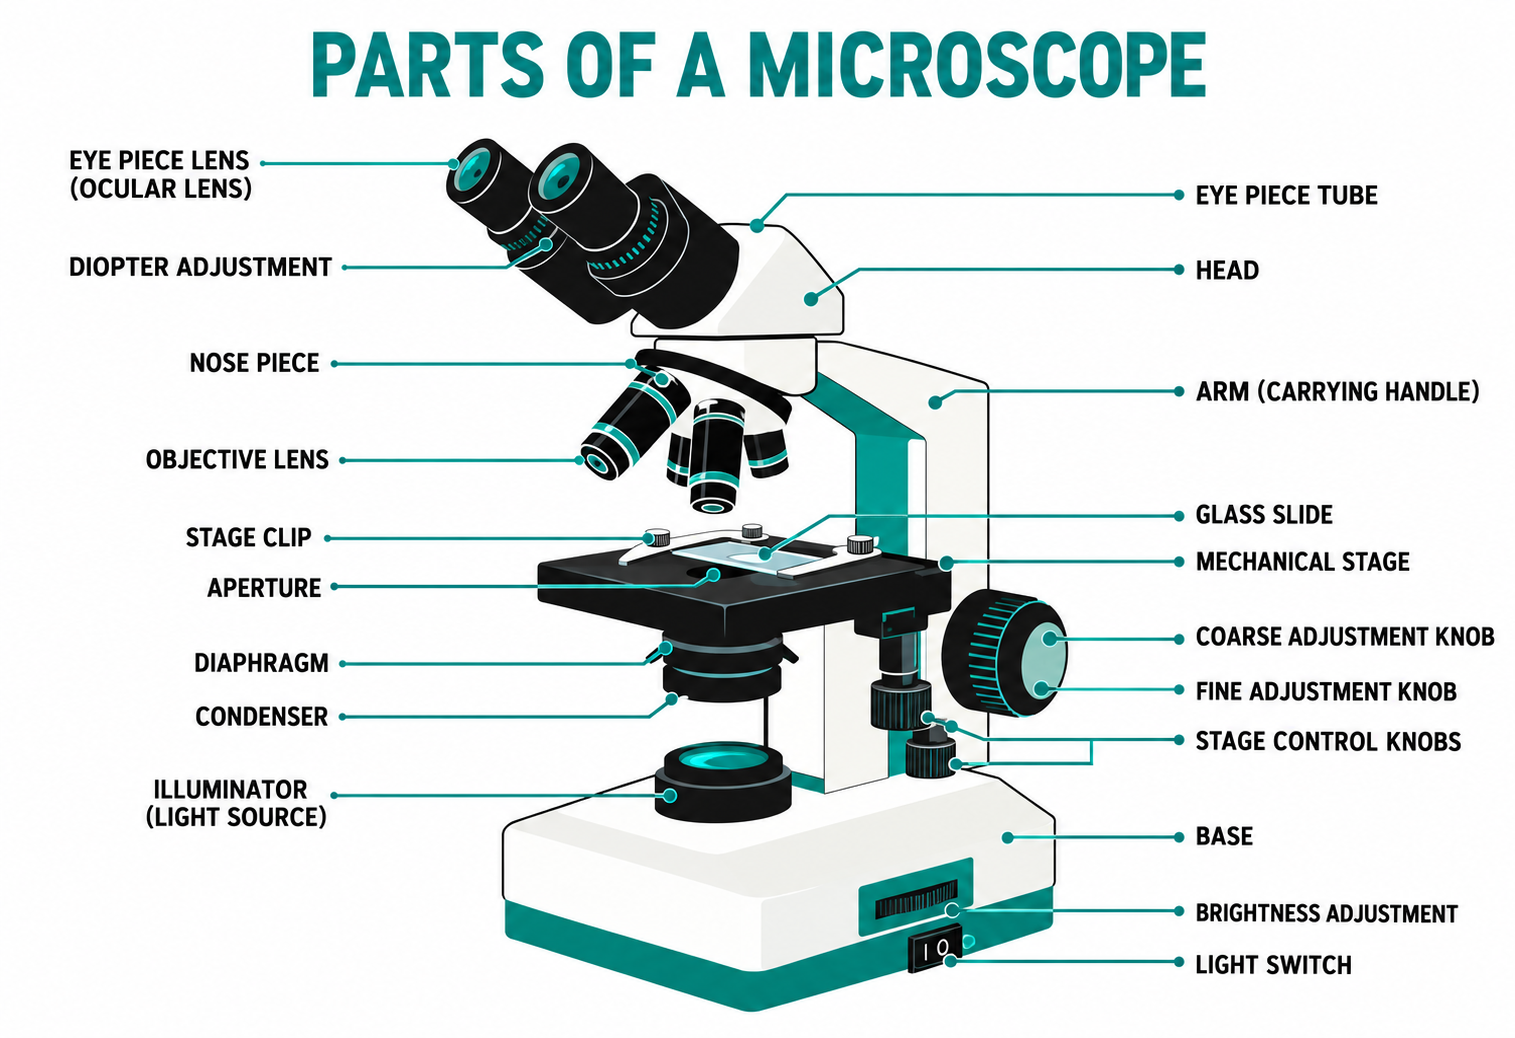
Compound light microscope — A microscope that uses an objective lens and an eyepiece. Light usually passes through a thin sample. It is useful for many cells and prepared slides. 복합 광학 현미경.
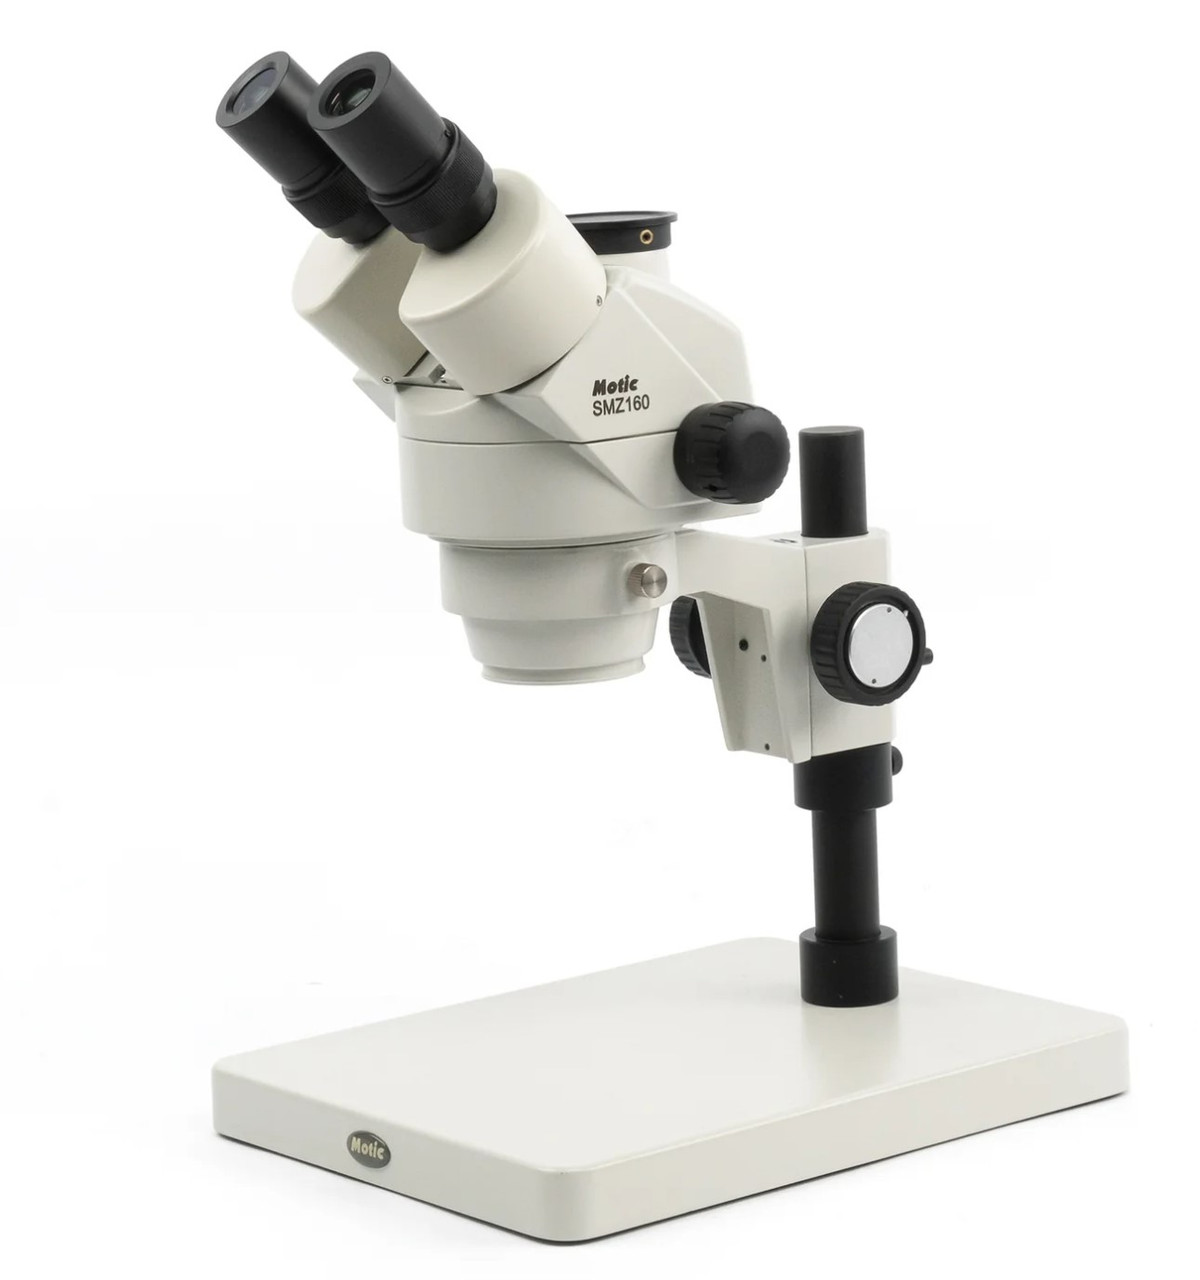
Stereo microscope — A microscope that gives a wide view of a small object’s surface. It usually works at lower magnification than a compound microscope. It is useful for sand, insects, and mineral grains. 실체 현미경.
Electron microscope — An instrument that forms images using electrons rather than visible light. It can reveal much smaller details than a school light microscope. Samples need specialised preparation and equipment. 전자 현미경.
Specimen — The object or material being examined. It may be a cell, a tissue slice, or a grain. Its preparation affects what can be seen. 관찰 표본.
Objective lens — The lens close to the specimen. A microscope may have several objectives that can be turned into position. Higher-power objectives generally leave less room above the slide. 대물렌즈.
Magnification — How much larger an image appears than the object. A larger image does not always contain more useful detail. The image also needs to be clear. 확대 배율.
Resolution — The ability to distinguish two nearby details as separate. Good resolution makes fine structure visible. Simply enlarging a blurred image does not improve it. 분해능.
Wet mount — A slide preparation with a sample in a small drop of liquid beneath a coverslip. It can help prevent a thin sample from drying quickly. Too much liquid can let the coverslip float. 습식 표본.
Micrometeorite — A very small particle of material that came from space and reached Earth. Some are partly or fully melted during atmospheric entry. A round or magnetic grain alone is not enough to identify one. 미세 운석.
Microscope Types: What Each One Shows
A compound light microscope is a useful choice for thin, partly transparent specimens. A lamp below the stage sends light through a slide. An objective lens near the specimen and an eyepiece near your eye enlarge the image. School instruments often have several objectives, such as 4×, 10×, and 40×. Begin with the lowest one: it shows a wider field of view and gives the lens more room above the slide. Onion skin and prepared tissue slices work well. A thick, opaque rock blocks the light, however, so turning to higher power will not solve that problem.
1] Why is a thin onion sample suitable for this instrument?
2] Why should you begin with the lowest-power objective?
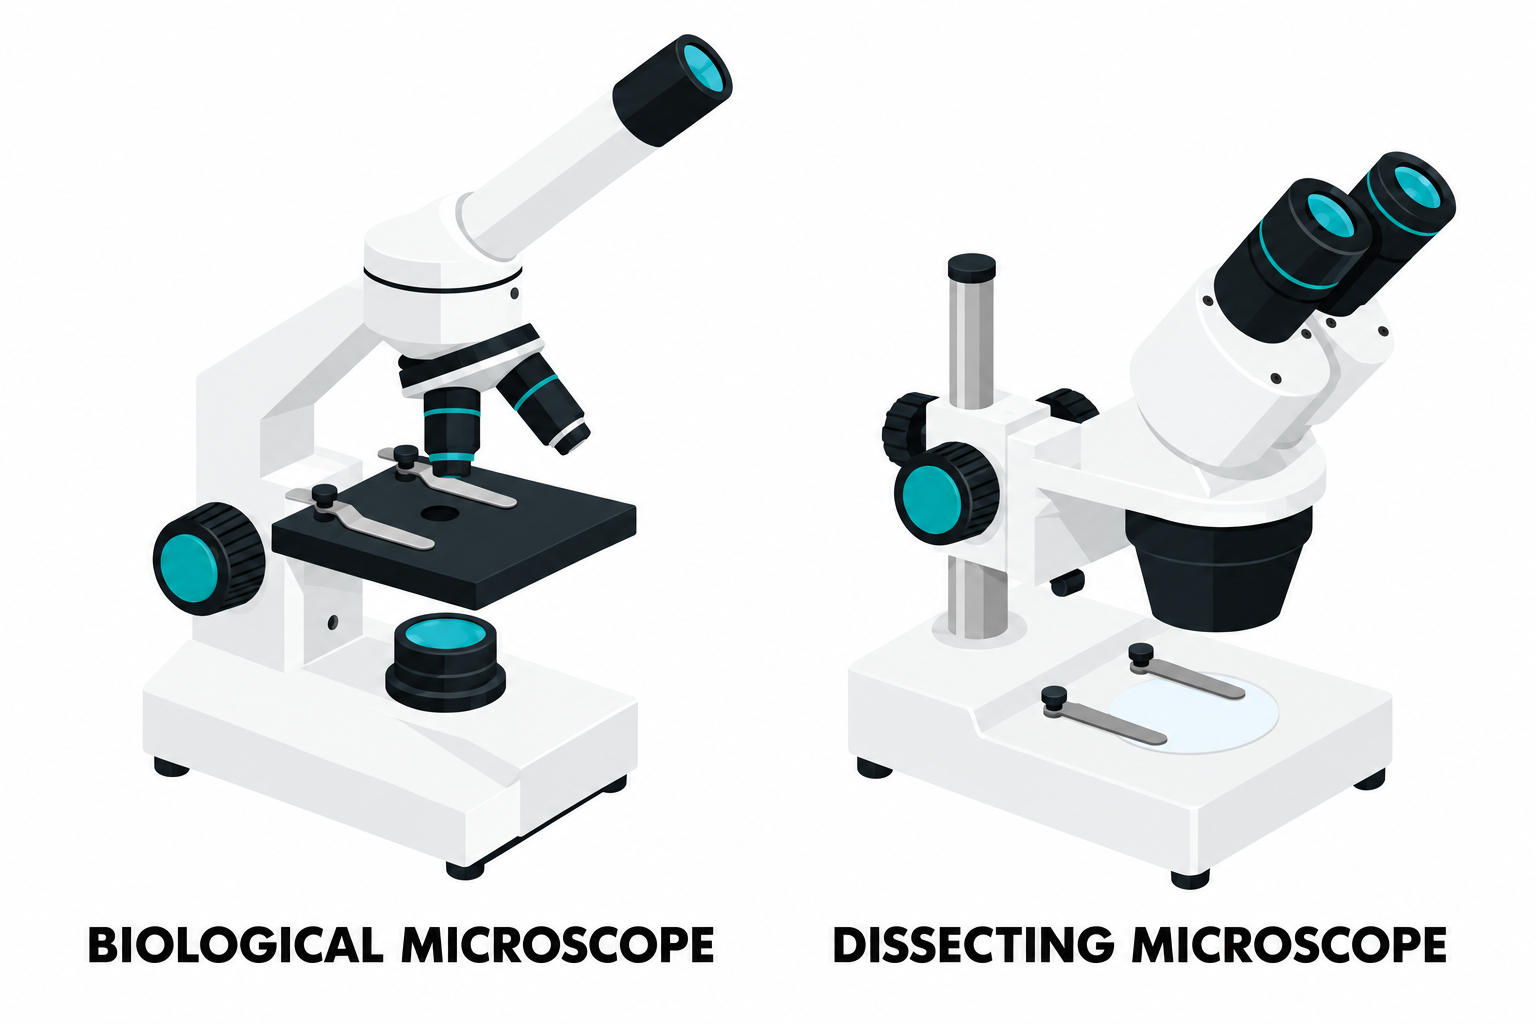
A stereo microscope usually looks down onto a specimen and can illuminate it from above. It shows a wider area and more of a solid object’s surface, often with a sense of depth. Put a few dry sand grains on a clean, shallow dish and start at low power. You can turn a grain with a soft brush to see another side. A stereo microscope is also useful for sorting small mineral grains or possible micrometeorites without crushing them beneath a coverslip. It usually cannot reveal the fine internal structures of cells as clearly as a compound microscope.
1] Which instrument would you choose first for dry sand grains, and why?
2] What can you learn by turning one grain?
Some laboratories use a polarizing light microscope to study a rock thin section. The rock is cut, attached to glass, and ground until it is usually about 30 micrometres thick. Light passes through many minerals, and polarizing filters can make differences between them easier to see. Turning the slide may change a mineral’s brightness or colour under crossed polarizers. Making a good thin section requires special equipment; a thick hand-cut chip is not an equivalent substitute. A prepared section lets students investigate crystal shapes and the way grains fit together without pretending that colour alone identifies every mineral.
1] Why must a rock be made very thin for this method?
2] What might you compare as you turn the prepared slide?
Electron microscopes are specialist instruments, not stronger versions of an ordinary eyepiece. A transmission electron microscope sends electrons through an extremely thin prepared sample to examine internal details. A scanning electron microscope detects signals from a scanned surface and can show fine surface texture. Both require specialised preparation, detectors, and carefully controlled conditions; most school specimens cannot simply be placed inside. These tools help researchers investigate tiny cell structures and particles far below the detail visible with an ordinary light microscope. For a home investigation, careful preparation and lighting on a simple instrument are usually more useful than wishing for an electron microscope.
1] Which electron instrument is suited to examining fine surface texture?
2] Why can you not use a school slide in an electron microscope without special preparation?
Light, Lenses, and the First Cell Observations
In 1665, Robert Hooke published drawings of thin cork viewed with a microscope. He described many small compartments and called them “cells” because they reminded him of little rooms. The cork cells he observed were dead; he could see their walls, not busy living interiors. Later observers examined living material and found that microscopic structures were widespread. These observations helped scientists develop the idea that living things are made of cells. The important habit was to draw and describe visible evidence before claiming what it meant. You can follow that habit with a labelled drawing of your own onion sample.
1] What did Hooke actually see in cork?
2] Why should an observer separate a drawing from an explanation?
A lens bends light to form an enlarged image. Magnification tells you how large the image appears, while resolution tells you whether nearby details remain separate. These are different qualities. If two tiny lines merge into one blur, making that blur bigger does not reveal the lines. Light microscopes also have a physical limit to the fine detail they can distinguish with visible light. A good 10× view may therefore answer a question better than a poor 40× view. Record both the objective used and the feature you can actually see; a large number on a lens is not evidence of a discovery.
1] What is the difference between magnification and resolution?
2] Why might a clear low-power image be more useful?
Contrast is the difference in appearance between a structure and its background. Transparent onion skin may look almost empty when the lamp is too bright. Reduce the light or partly close the diaphragm, if the instrument has one, and see whether cell boundaries become clearer. Too little light also hides detail, so make small adjustments rather than turning everything fully down. A suitable classroom stain can reveal some pale structures, but use it only with a teacher’s instructions; stains may change or kill living material. Compare an unstained and a stained preparation when possible, and note which features changed in appearance.
1] How might you improve the view of a pale structure?
2] Why should you record whether a specimen was stained?
Evidence also depends on scale and a record of the conditions. A drawing should include the sample name, collection place when relevant, date, and objective used. Draw the shapes you can actually distinguish rather than filling in structures from a textbook picture. A ruler beside a grain in a photograph provides a useful size reference, although an ordinary ruler may be too coarse for a cell. If your microscope has a calibrated scale, use its instructions. Compare several fields of view before deciding that one unusual shape represents the whole sample. A single field can be an interesting clue, not a complete survey.
1] What information should accompany a labelled drawing?
2] Why should you examine several fields of view?
Preparing Cells, Thin Slices, and Dry Samples
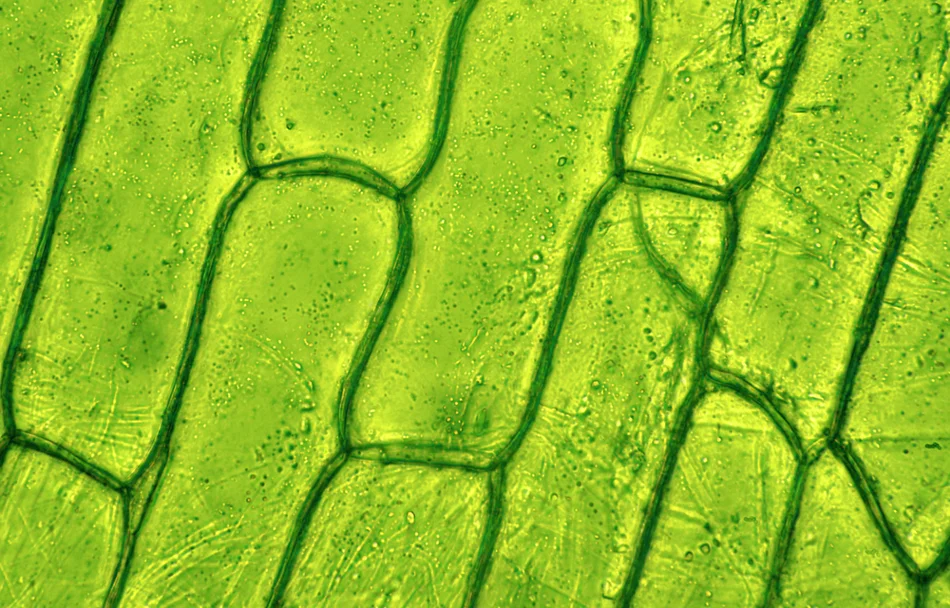
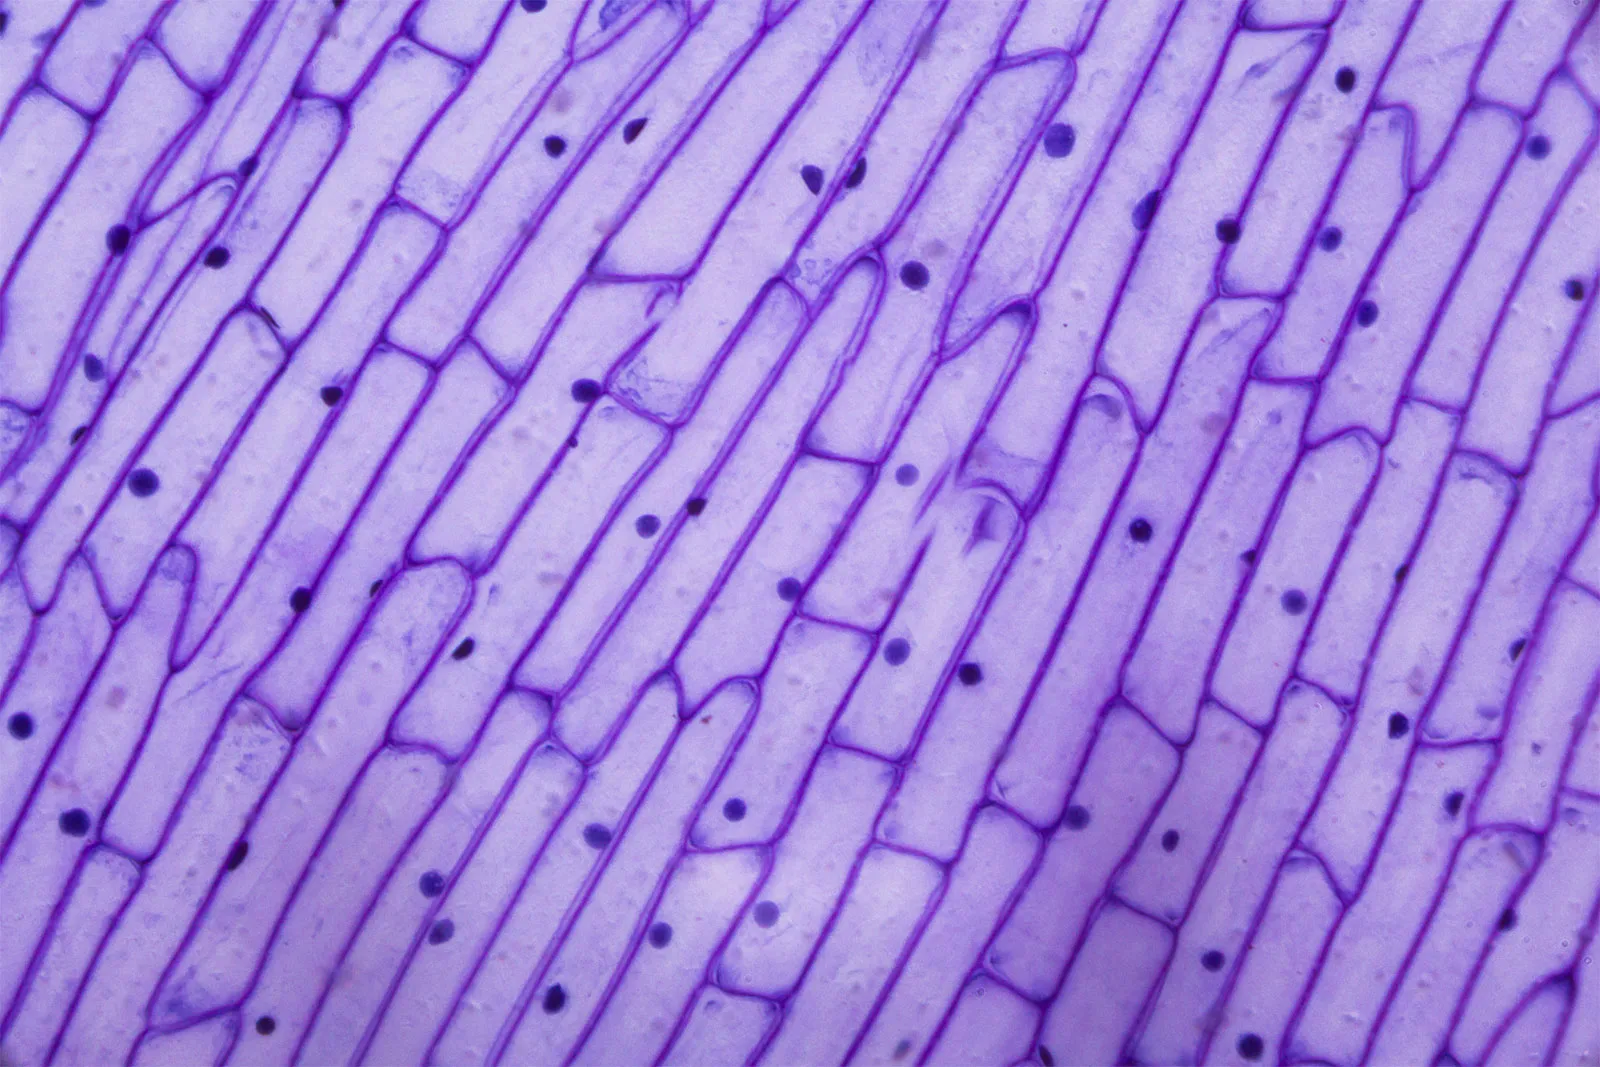
To make an onion wet mount, peel a very thin piece of the inner skin and lay it flat on a clean slide. Add one small drop of water. Lower one edge of a coverslip onto the drop, then lower the rest slowly to reduce trapped air. Blot excess water with a paper towel; do not press on the coverslip. Place the slide on the stage and start at low power. Look for repeated rectangular outlines: these are cell walls. Ordinary onion bulb skin usually lacks visible green chloroplasts, so do not draw green dots merely because a diagram shows them in another plant.
1] How does lowering the coverslip slowly help?
2] What repeated structure should you seek in onion skin?
For a thin plant slice, the practical question is whether light can pass through it. A carefully cut, thin piece of a soft leaf stalk may show layers, while a thick piece appears dark and crowded. Cutting tools can injure fingers, so a teacher should prepare slices or supervise cutting; never hold material in your hand while cutting toward it. Place the slice flat in water beneath a coverslip. At low power, find the overall arrangement before selecting one area for closer study. Move the slide gently and refocus with the fine control. A prepared commercial tissue slide is often clearer and safer for examining complex tissue.
1] What happens when a slice is too thick?
2] Why should you examine its overall arrangement first?
Surprisingly, the best place to buy this sort of gear is from India.
A clear drop of pond water may contain moving organisms, plant fragments, and ordinary debris. Use only water from a safe, permitted source, and do not culture unknown organisms. Place a small drop on a slide, lower the coverslip, and begin at low power. Wait briefly if the liquid is moving rapidly. Follow a moving object by shifting the slide a little, rather than repeatedly turning the focus knob. Do not identify an organism from one blurry glimpse. Afterward, wash your hands, clean the work area, and follow the teacher’s directions for disposing of the sample. Never taste or smell it to “test” what it is.
1] Why should you start at low power with pond water?
2] What should you do before naming an unfamiliar organism?
Dry sand and mineral grains need a different preparation. Spread only a few grains in a shallow dish or on a dark or light background that makes their edges visible. Use a stereo microscope and light from above; try moving the lamp sideways to reveal surface texture. Compare transparent, opaque, angular, and rounded grains. You may see several minerals, but visual appearance alone often cannot identify a grain with certainty. Keep samples from different collection places in separate, labelled containers. If using a compound microscope, select a single tiny grain at low power and leave ample space between the objective and the slide.
1] How can side lighting help you inspect a grain?
2] Why should samples from different places remain separate?
Better Images, Common Mistakes, and Safe Practice
Set a compound microscope to its lowest-power objective before placing a slide on the stage. Watch from the side as you bring the lens near the slide, following the instrument’s focusing instructions. Then look through the eyepiece and focus so the lens moves away from the slide. Centre the feature before switching to higher power: the field of view becomes smaller. At high power, use the fine focus knob only. If the image vanishes, return to low power and find it again. Never force a knob or allow an objective to press into a slide; glass and lenses both lose that contest.
1] Why should you centre a feature before increasing power?
2] Which focus control should you use at high power?
If an image looks poor, test one possible cause at a time. A uniformly pale view may need less light or better contrast. A dark view may need more light, a thinner specimen, or a properly centred opening. A round shape with a dark rim may be an air bubble; shift focus to see whether it has the expected structure of your specimen. Marks that stay in the same position when you move the slide may be on a lens. Clean lenses only with suitable lens paper, following the instrument’s instructions. Do not use a shirt sleeve, rough tissue, or a finger.
1] How can moving the slide help locate a dirty mark?
2] What two changes might improve a dark image?
Micrometeorite hunting is a useful exercise in scientific caution. Some particles from space become rounded as they heat while entering the atmosphere. But welding, grinding, fireworks, and other Earth-based processes can also produce tiny spheres. A magnet may help sort some iron-rich grains, yet attraction to a magnet does not prove an extraterrestrial origin. Collect only where permitted, keep the source and method in your notes, and examine candidates with a stereo microscope. Record shape, texture, and colour without announcing a discovery. Reliable identification may require laboratory measurements of composition and structure; many attractive candidates will be false positives.
1] Why is a magnetic round grain only a candidate?
2] What evidence should accompany a collected grain?
A useful investigation changes one condition at a time and keeps a record. Compare the same onion cells with two light settings, or compare sand grains from two labelled places under the same lighting. Sketch several examples, including grains that do not fit your first idea. Keep water away from electrical parts, carry a microscope with support under its base, and return it to low power after use. Future instruments may show ever finer structures, but careful observations remain necessary: a sharper image can reveal a feature without explaining its cause. The observer must still ask what else could produce the pattern.
1] Why should you change only one condition at a time?
2] Why does a sharper image still need interpretation?
Homework
Writing tasks
For each task, write approximately one page.
1] Explain why you would prepare onion skin as a thin wet mount. Address light, water, the coverslip, and air bubbles.
2] Argue whether clear low-power viewing or the highest available magnification is more useful for finding an unfamiliar specimen. Give two examples.
3] Explain how you would compare sand from two collection places fairly. Address labels, lighting, and the number of grains observed.
4] Explain why a pale cell may become easier to see when you adjust the lamp or diaphragm. Address contrast and the limits of too little light.
5] Describe how you would investigate a round shape under a coverslip. Explain how you could test whether it is an air bubble.
6] Explain why a thick rock chip and a prepared rock thin section reveal different information. Address transmitted light and minerals.
7] Argue for the best first instrument for examining dry sand. Compare its strengths with those of a compound light microscope.
8] Explain why a photograph of a magnetic sphere is insufficient evidence that it came from space. Address possible Earth-based sources and further tests.
9] Describe the notes and drawings you would make during an observation. Explain how another student could use them to check your claim.
10] Explain how microscope safety rules protect both the observer and the evidence. Address cutting, slides, lenses, water, and unknown samples.
Debate topics
1] Should a school buy several sturdy stereo microscopes before buying one more advanced compound microscope?
Side A — Yes, because: 1) many students could examine solid samples at once; 2) sand and insects need little preparation; 3) handling at low power is relatively simple.
Side B — No, because: 1) the existing compound microscopes may need replacement; 2) cells and thin tissue are central to the course; 3) prepared slides support many investigations.
2] Should a class publish photographs of possible micrometeorites as discoveries before laboratory confirmation?
Side A — Yes, because: 1) sharing candidates can invite expert help; 2) the collection method can be made public; 3) a clearly marked preliminary report may encourage checking.
Side B — No, because: 1) photographs cannot establish origin; 2) false claims spread easily; 3) waiting for tests gives a more reliable result.
3] Should students use a stain whenever an unstained cell is difficult to see?
Side A — Yes, because: 1) some structures become clearer; 2) students can make more precise drawings; 3) comparisons may be easier.
Side B — No, because: 1) the stain can alter living material; 2) adjusting light may be sufficient; 3) an unstained view provides a useful comparison.
Answer the following questions in full sentences. If you don’t know the right answer, add a (?) mark, and later we can look at it together.
1] What kind of specimen suits a compound light microscope?
2] Why does a stereo microscope suit a dry sand grain?
3] What can a rock thin section show when light passes through it?
4] How does a transmission electron microscope differ from a scanning electron microscope?
5] What did Robert Hooke observe in cork?
6] What does resolution describe?
7] Why does greater magnification sometimes fail to reveal more detail?
8] How can changing illumination improve contrast?
9] What information should accompany a drawing of a specimen?
10] Why should an observer inspect more than one field of view?
11] How do you make a simple onion wet mount?
12] What are the rectangular outlines commonly seen in onion skin?
13] Why is a thick plant slice difficult to examine with transmitted light?
14] How should you handle an unknown pond-water sample?
15] How can side lighting reveal features of a mineral grain?
16] Why must you centre a feature before changing to higher power?
17] How can you investigate whether a round feature is an air bubble?
18] Why should lenses be cleaned with suitable lens paper?
19] Why does a magnetic sphere not prove a space origin?
20] Why must a scientist interpret even a very sharp image cautiously?
Teaching illustrations and similes
1] Field of view — Looking through a low-power objective is like viewing a whole page; high power is like viewing one word. The microscope also changes detail and working distance, not just the area visible.
2] Magnification and resolution — Enlarging a blurry photograph makes a bigger blur. A real microscope image is formed by optics, but enlargement alone still cannot create missing detail.
3] Thin specimens — Light passes through a thin slice of fruit more readily than through a whole fruit. Actual transparency also depends on the material, not only its thickness.
4] Contrast — Pale writing on white paper is harder to read than dark writing on white paper. Cells can gain contrast by several optical methods besides staining.
5] Focusing — A camera focused on a window may blur a tree outside it. A microscope focuses at a much smaller scale and through the specimen’s depth.
6] Wet mount — A coverslip is like a small transparent roof over a drop. It also changes the thickness and optical path, so it is more than a lid.
7] Stereo viewing — Turning a pebble in your fingers reveals sides hidden from one direction. A stereo microscope makes those surfaces easier to inspect but does not show every hidden interior.
8] Thin section — A very thin slice of rock is like a slice of bread held toward light. Minerals transmit and alter light differently, so the comparison does not predict their colours.
9] Sampling — Judging a whole beach from one grain is like judging a library from one book. A well-chosen sample can still be useful if its limits are stated.
10] Candidate identification — A magnetic sphere is like a person wearing a team colour: it is a clue, not proof of membership. Chemical and structural evidence may still be needed.